
Tuesday, September 28, 2010
Leaves a changin'
Friday, July 23, 2010
Sugar Cookie Goodness!
I was feeling all "Betty Crocker" a few weeks ago and decided to make some sugar cookies that looked like watermelons. They turned out great! I thought I'd share a "How To", even though most could probably figure it out on their own. :) Anyway...they were delicious! Unfortunately my intended recipients I couldn't get a hold of in time to deliver them. :( It's the thought that counts...right?
Recipe:
1 c. butter
1.5 c. sugar
2 eggs
1 tsp baking soda
2 tsp baking powder
1 tsp vanilla
1 c. milk
5 c. flour *
*may need additional flour to make it feel tacky but not sticky, but not too much as you will pick up additional flour when you knead and roll out the dough. I usually end up adding around 1/4-1/2 cup additional flour.
Directions:
-preheat oven to 350 degrees
-cream butter and sugar together
-add eggs and vanilla; mix
-add baking soda and powder; mix
-add 2 cups flour; mix
-add 1/2 of the milk; mix
-add 2 cups flour; mix
-add remaining milk; mix
-add 1 cup flour; mix
-test "tackiness" of dough and add additional flour if necessary
Sprinkle flour on clean counter top in preparation to knead and roll out dough.
Knead just until the dough will make a nice ball-like shape, then roll out. It's helpful if you sprinkle a little flour on you rolling pin as well to help keep the dough from sticking to it.
 I had already cut a few cookies when I decided to start taking pictures. If you don't have a half circle cookie cutter, as I do not, use a pizza cutter to get a flat edge and a large circle, but cut only half the shape.
After you have cut the length of your dough with the cookie cutter, use pizza cutter to cut another flat edge. Of course you keep the dough in a pile to re-knead and roll for additional cookies.
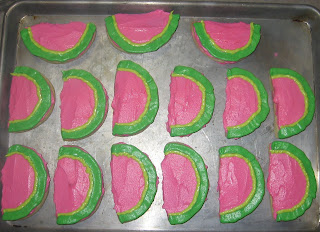
 Here's what you end up with. A bunch of half circles that resemble a watermelon slice shape. :)
I happened to have a scalloped edge circle cookie cutter too that would be cute to make it look like a bite was taken out of the watermelons, but I opted not to use it. Thought I would throw it out there though for all you "over-achievers"! :) Bake cookies approximately 10-13 minutes. They are done when they are puffy and spring back up when gently pressed.
I like to use the Wilton Buttercream frosting recipe, but you can use whatever type you prefer as long as it keeps its shape fairly well. I would suggest doubling the recipe. I didn't have enough to frost all the cookies I made. Here's the Wilton recipe:
1/2 c. solid vegetable shortening
1/2 c. butter, softened
1 tsp. vanilla (if I'm using imitation vanilla, I do 2 tsp.)
4 c. sifted powdered sugar (I never sift mine unless it's really clumpy)
2 Tbs. milk
Cream butter and shortening together, add vanilla, add 2 cups powdered sugar, add milk, add 2 cups powdered sugar. Divide frosting into separate containers for coloring. The majority of the frosting will need to be pink. You'll need about 1.5 cups of the darker green, 1/2 cup of the lime green, and about 1/4 cup of the black. These are just guesstimations...I didn't actually measure out my frosting.

Frost all the cookies with pink frosting after they have cooled completely.

Add the dark green watermelon rind using a disposable icing bag and a flat tip (not sure of the #).
 For the lime green, I just used a sandwich baggie and barely nipped the tip off. I would have preferred to use my dot icing tip to make a nicer line, but I couldn't find it.
:( The sandwich baggie worked well enough.
 Using another sandwich baggie with a nipped tip, I made the seeds. And that completes your watermelon sugar cookies! Sorry I don't take pictures that are all cutesy! I guess I'll have to work on that! :)
Tuesday, June 8, 2010
Might seem silly...
Okay...before you continue with this post...I know what you're going to think...
What kind of crazy person takes the time to fold her grocery bags?! Who has that kind of time...and more...who has that kind of time and then posts about it?!?
Well..I'm the crazy person. And I don't necessarily have extra time on my hands...I'm just procrastinating the laundry heap...or as I like to call it...Mt. Everest. :)
Anyway...this post is mostly a joke (just for you Gwen!), but secretly...not really. I think at one point or another in our homemaking lives we've fumbled around with plastic grocery bags. We open the pantry door and they seem to attack us from all angles. I swear one deliberately flew out, plastered to my face and tried to suffocate me. Okay, not really, and maybe it's just been me, but MAN...I hate 'em...but I love 'em. Whether they be used for stinky diapers, bathroom trash bags, cleaning out the car or whatever! My previous method of storing them was to shove them all into one bag, but it seemed impossible to get just one out when I needed it so I was constantly re-shoving them back into the bag. I tried the slit an X in the top of some container with a plastic lid method, but would run into the same problem of more than one bag coming out or getting caught and ripped on the points of the plastic lid, etc...
Soooooo...I happened upon the following method when my hubby and I lived with his parents for a few months....okay it was more like a year, but hey...we were transitioning...new baby, finishing school, new careers...yadda yadda yadda. Anywho...my mom-in-law stored her bags this way and I thought...Wow! That is SWELL! So here goes!

Pop the corners and handles of the bag to lay it flat on the counter.

Fold the bag in half.

Fold the bag 1/3

Fold an additional 1/3.

Hold bag between thumb, index and middle finger. Keep index and middle finger slightly spaced.

Wrap bag around index and middle finger leaving the handles as a "tail". You want it snug, but not too tight or you'll have a hard time sliding the bag off your fingers.

Twist "tail" a couple times and slip middle finger out of the center, but continue to hold bag with index finger and thumb.

Tuck tail into center and remove your index finger.

Voila! I like to smush mine flat on the counter once they're all rolled and tucked.

Now...if you have one of these laying around...they make a GREAT container for holding the bags.
 And there you have it. Never again will I wrestle with, nor have nightmares of being suffocated by, a disgruntled plastic grocery bag again! Seriously, once you try this method...you'll never go back to any other. :)
Subscribe to:
Posts (Atom)
